8
$\begingroup$

Issue

So I managed to get this particle system to place trees where I want them to be, but I tried everything and couldn't space them out, is it even possible? I tried forces or whatever and all it did was rotate trees on y and x axes (I tried both harmonic and force mode).

I've never worked with particles in blender before so it's all new to me.

I was googling for a few hours and no results...

EDIT: since it's relatively small area, I will just make particles real objects and will move/delete trees as I want, but I'd still like to know the answer.

$\endgroup$
6
  • $\begingroup$ Using less particles isn't an option, not to mention that I tried putting around 40 (compared to initial 400) of them and they still manage to get inside of eachother... $\endgroup$
    – Purple Ice
    Commented Aug 5, 2016 at 16:13
  • $\begingroup$ Please show a well presented screen capture of your particle system panel and emitter. If you need to combine multiple images into one ... that is an option. $\endgroup$ Commented Aug 5, 2016 at 16:17
  • $\begingroup$ Create a second new grid surface only for particle trees new, widely spaced and bigger faces to accomodate a tree with extra space to suit your tastes. This is easy and fast. 8 minutes or less. If you use a more coarse and larger grid (second newly created) you can control the spacing with no change to visible terrain. This grid can use the [shrink wrap modifier] to lay near the visible terrain. Lastly if you duplicate the visible surface you can randomly via selection and manually remove faces to control face duplication location. $\endgroup$ Commented Aug 5, 2016 at 16:24
  • $\begingroup$ The only thing I changed in it is how many particles I need, what object I want to use and made trees(hair particle mode) "grow" out of vertices. $\endgroup$
    – Purple Ice
    Commented Aug 5, 2016 at 17:02
  • $\begingroup$ Your image seems to have been deleted by IMGUR $\endgroup$ Commented Jul 23, 2018 at 19:16

1 Answer 1

3
$\begingroup$

enter image description here

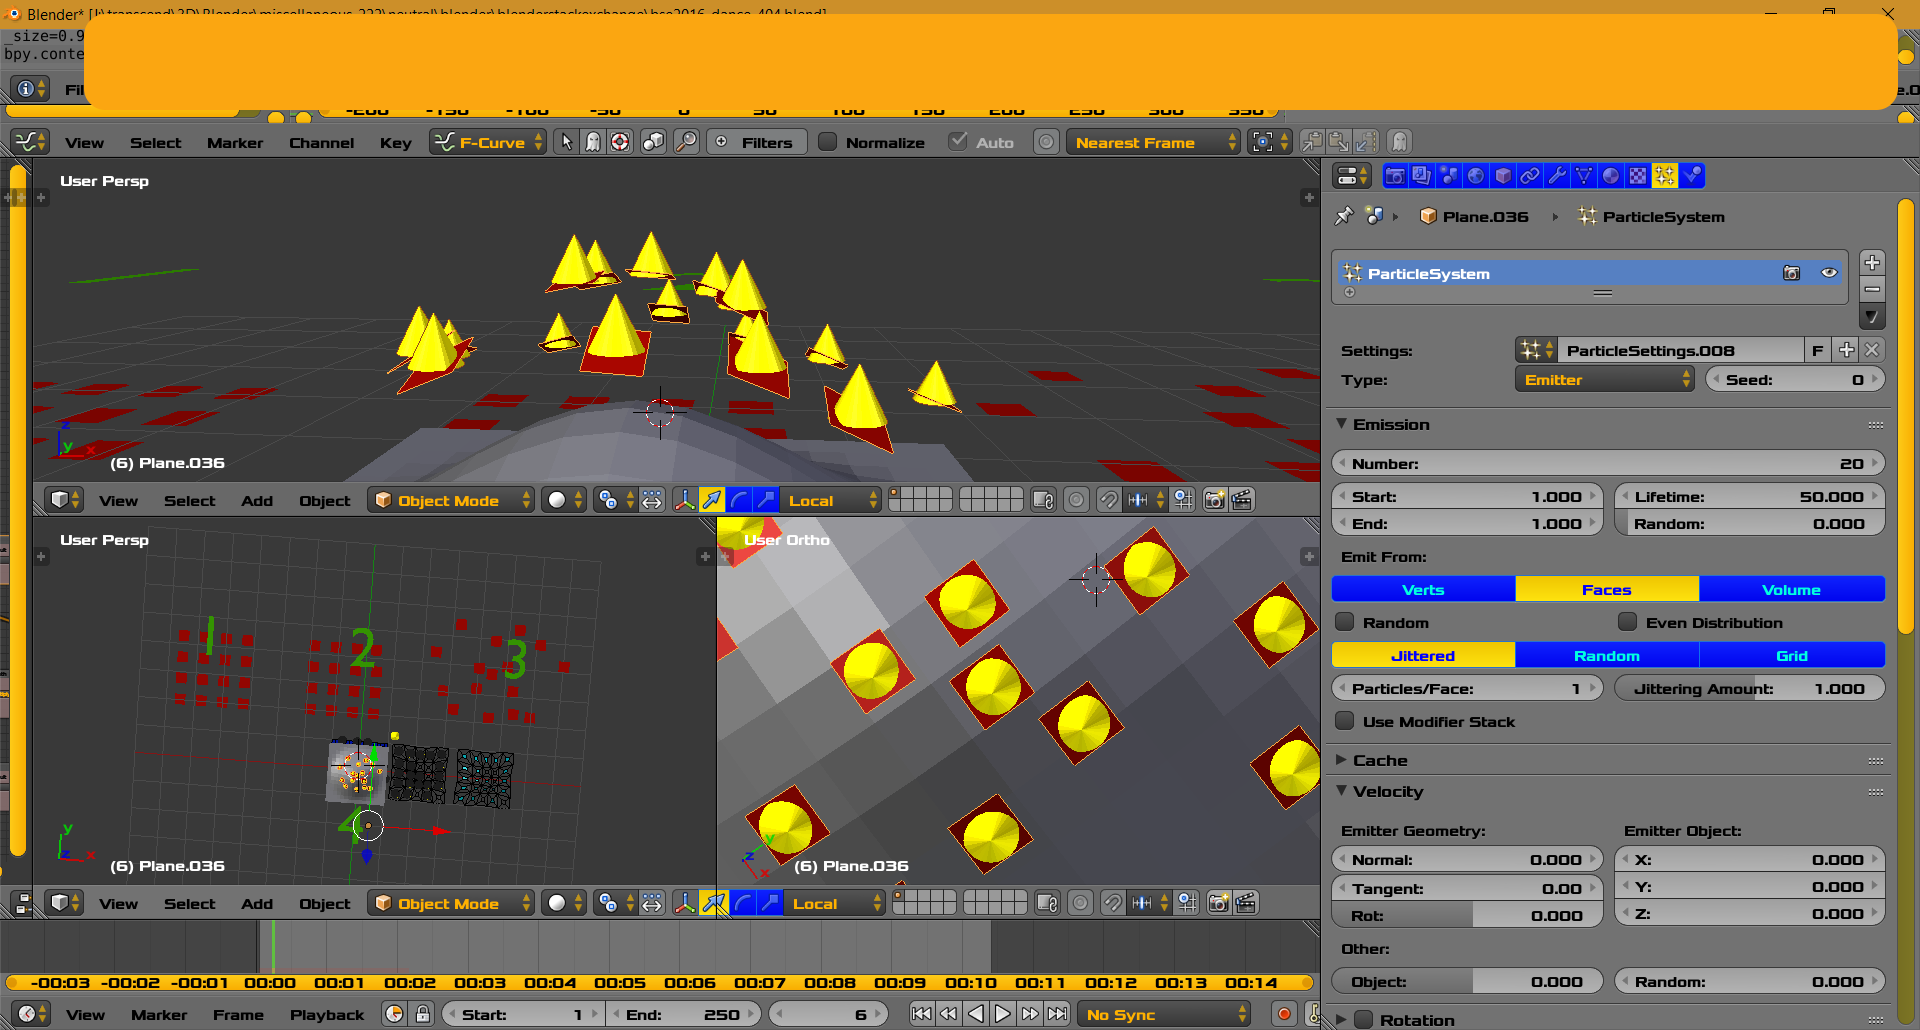
In the image above are green numbers 1-4

  1. Small Red Plane with two array modifiers. Appears as many red squares.

  2. Array Modifiers applied. Single Object. Edit Mode. Separate loose parts. Now many separate red square objects. Many different methods can be used to create multiple red squares including Shift-D

  3. Proportional Editing Object Mode. Moving object planes in XY only. No distortion.
  4. Join separate planes into one mesh. Space search [Join]. Shrink Wrap Modifier. Apply Shrink Wrap. Add a single Particle System.

The above steps are Artwork via the proportional edit. This may feel more natural for some Artists. We are saving computer resources by not using Make Real on complex objects. Your computer, your choice. Proportional edit can be done in edit mode if rectangle distortion is acceptable.

Create a Second Particle Surface

enter image description here


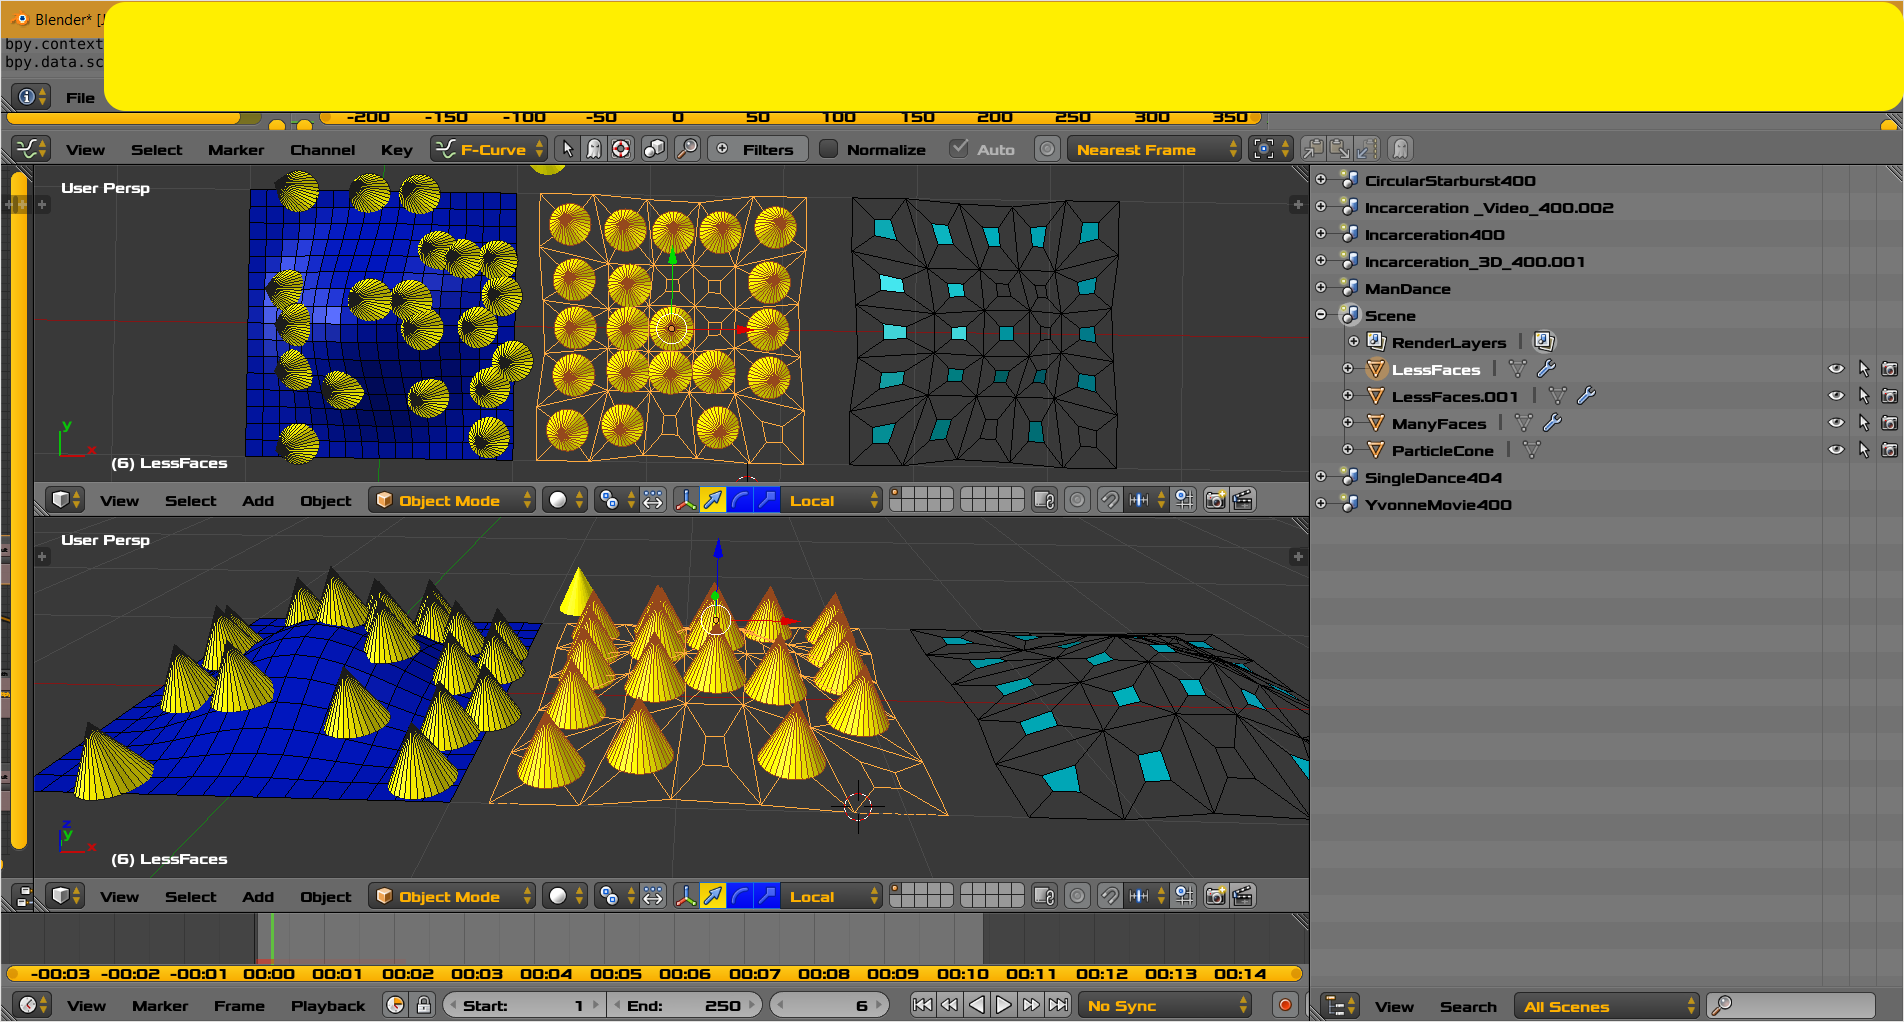
Second method of creating another surface . In the image above the dark blue mesh on the left has a particle system with particles overlapping. On the far right is a mesh with shape originating from the dark blue surface and showing faces and other spacing vertices. The middle mesh shows a successful particle system with no overlap of particles. Click image to see detail.

  • Original Plane Exists.

  • New Plane. Loop Cut in Both Directions Coarsely. The more loop cuts you have the more vertex density and more final isolated rectangles you will have. More vertex density allows more flexibility. This is a technical explanation not. You have the Artistic freedom. Place New plane Above Old plane. Shrink Wrap Modifier is used with new plane with settings suited to your tastes. Apply Shrink Wrap. Now new plane has general shape of old with less vertices

  • New Plane in edit mode. Face Selection Mode. Median Scale Mode. Select all. Extrude [Individual] Faces from Menu. No Movement. Accept operation. Scale Small. Invert Selection. Delete Faces Only. You should be left with islands of faces as shown above. Note this a very technical sequence of steps. No artistic effort.

  • You can also create spaced grid first and then Shrink Wrap.

  • Inspect and Test. If desired manually or randomly select from menu, more faces. Delete faces only.

  • In object mode you can created many rectangle objects and proportionally move them in object mode then join them to form a mesh.

  • You can also consider creating rectangle particles. Particle Pane ... then make Particles real. Join all particles. Then delete rectangle to your tastes. Add back particle system with artistic particles. Not shown ... yet. My proposed answer time has expired at the moment.

  • You can also consider weight painting. Not Shown.

  • Of course I may have left out some steps. Please excuse those errors.

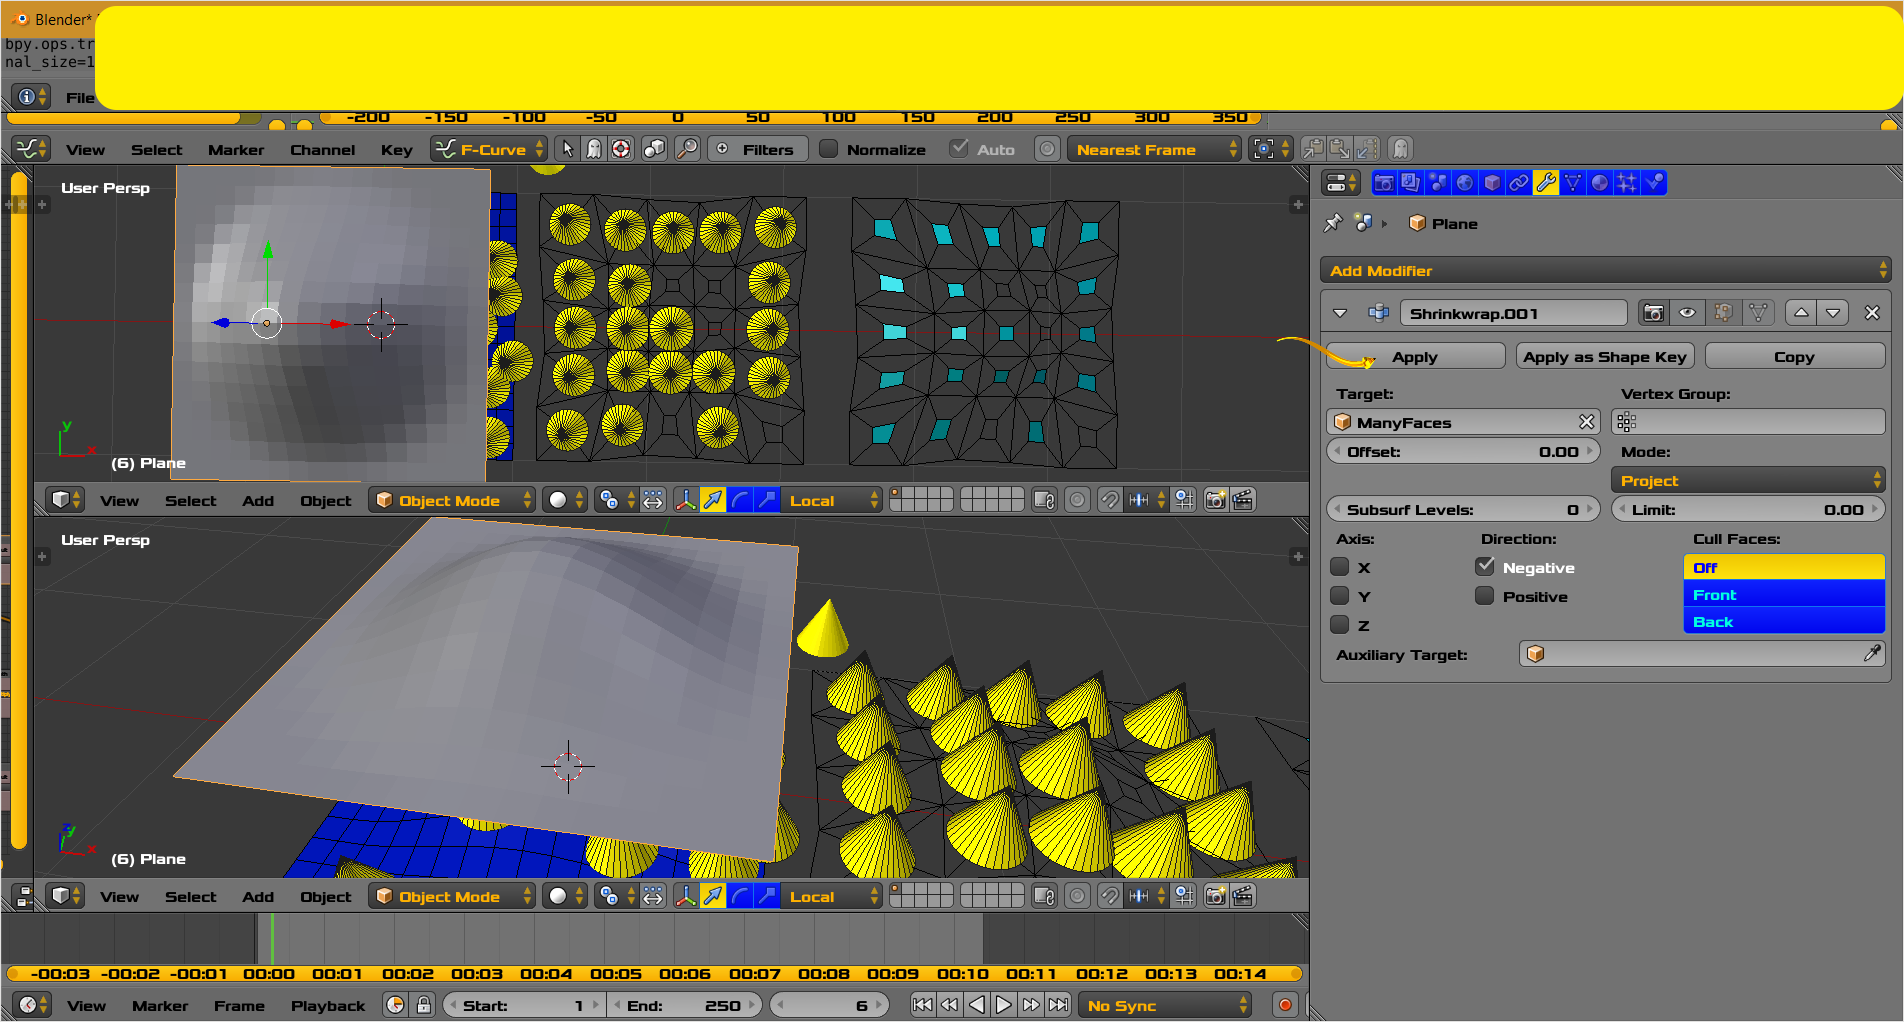
enter image description here

  • In the image above are the Shrink Wrap Modifier settings. In order to get reasonable documentation images the eye visibility setting is inactive. Documentation and Actual use create a few steps I have omitted without a video.

$\endgroup$
2
  • $\begingroup$ Thank you, this is actually pretty good solution, but I just realized that I selected whole area for that vertex group... I will try selecting faces far enough apart and limit particles one per face/vertice(just found that option...) and see how it goes, as I want them to occur more "naturally", because this solution looks hand-made or needs a lot of time to look good enough. You showed me that blender is a program which allows you to add your own functionality by simply being creative. $\endgroup$
    – Purple Ice
    Commented Aug 5, 2016 at 21:34
  • $\begingroup$ @PurpleIce Please see edits for second method. $\endgroup$ Commented Aug 6, 2016 at 6:58

You must log in to answer this question.

Not the answer you're looking for? Browse other questions tagged .