5
$\begingroup$

This question has two parts.

• First – I'd like to know how to make a rectangle with a curve on it. Don't misunderstand me, I DON'T need to know how to make a rectangle with rounded curves. I want the actual rectangle to be curved. See the screenshot below.

• Second – Once I get that rounded rectangle, I'm having problems with making a material go along the curve. Again, this will be explained throughout my question.


Here is a mockup of what I want.

Example Image


The Curve.

As you can see in this image, I have a rectangle curved along the top/bottom faces. Its corners are not rounded (meaning they look sharp), but the rest of it is smooth. It doesn't look like a bunch of small rectangles (like it would if I merely subdivided it), it looks like a rounded rectangle. A curved rectangle.


The Appearance.

Also shown in the above image, the corners are colored black. The mass-majority of each of the faces is a grey color, but the edges are black. I would think it's a simple task, but I'm still beginner at Blender.


What I Have Tried.

I have already tried making a curved rectangle, but I'm having problems making it look smooth like I explained above. Applying a "Smooth Shading" makes the curve look smooth, but the edges aren't sharp like a normal rectangle. I have tried applying a Bézier Curve, but that is a little complicated for my limited experience. All the tutorials I can find are either irrelevant or unhelpful.

As far as the material, I am completely stumped here. I can't draw it on, because it turns out looking horrible. I don't know how to work the "UV Editing" window. I have looked for tutorials, but they are again unhelpful.


What Do I Need?

I would appreciate a full-length description. Maybe add in some screenshots (gifs would be amazing!). OR, I would also appreciate some links to tutorials that would help me. Like I already said multiple times, I can't find very much on Youtube. Some help would be appreciated.

Thanks for any tips you can give me! If my question needs revising, please let me know so that I can fix it!! I absolutely need some answers here.

$\endgroup$
5
  • 3
    $\begingroup$ Hello. It is the custom at BSE to have a single topic if possible. So the shape of the object would be considered a different topic from the material of the object. That may also help you searching for answers and people providing answers. $\endgroup$ Commented Apr 4, 2016 at 23:50
  • 1
    $\begingroup$ possible duplicate: blender.stackexchange.com/questions/34598/how-to-curve-my-mesh $\endgroup$
    – user1853
    Commented Apr 5, 2016 at 0:01
  • $\begingroup$ If you need a video tutorial you may state so in your question. $\endgroup$ Commented Apr 5, 2016 at 0:08
  • $\begingroup$ @atomicbezierslinger Thanks for the tips. I guess you're right about multiple topics, but I assumed these were two-in-one. The same project. Am I wrong? ;) $\endgroup$ Commented Apr 5, 2016 at 0:10
  • 1
    $\begingroup$ I count at least two topics. IMHO IIHO $\endgroup$ Commented Apr 5, 2016 at 0:16

2 Answers 2

3
$\begingroup$

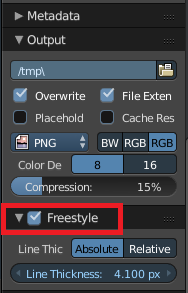
The object itself has been covered, so I will address materials. I will cover internal and cycles as you did not specify what render engine you are using. To get the outline on your object you want to use freestyle in your render settings. This is what you're looking for if you haven't yet seen it:

enter image description here

For internal engine material, I went with a simple light gray diffuse with toon shading, and the same for specular. Then adjusted the size and smoothness until I was happy with the look. enter image description here

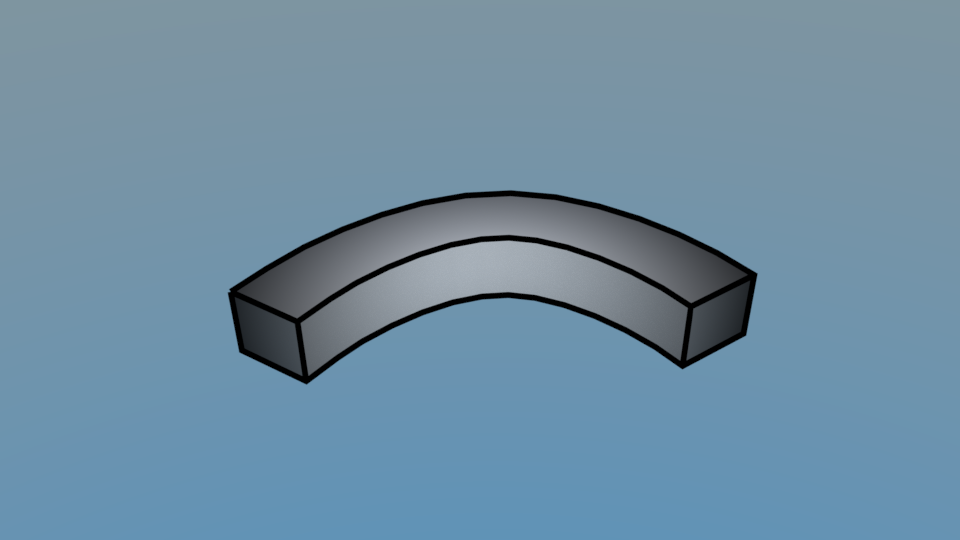
My result was this: enter image description here

For cycles, I chose a gradient texture that was driven by an empty. To do this, in the node editor add a input>texture coordinate node then, a vector>mapping node. connect the two from the object output of the texture coordinate node to the vector input of the mapping node. Also choose 'empty' from the list of available objects in the coordinate node. Connect the mapping node to the texture node, then the diffuse, then material output. Scale the empty to adjust the gradient, and that's about it. Settings and result:

enter image description here

enter image description here

$\endgroup$
2
  • $\begingroup$ Great answer! This is definitely what I'm looking for. I'm using your first solution. But when I export it, what do I tick to include the black outline created with "Freestyle?" I have the grey material on it correctly, but not the outline. $\endgroup$ Commented Apr 5, 2016 at 18:12
  • $\begingroup$ I'm exporting a COLLIDA (.dae). $\endgroup$ Commented Apr 5, 2016 at 18:14
5
$\begingroup$

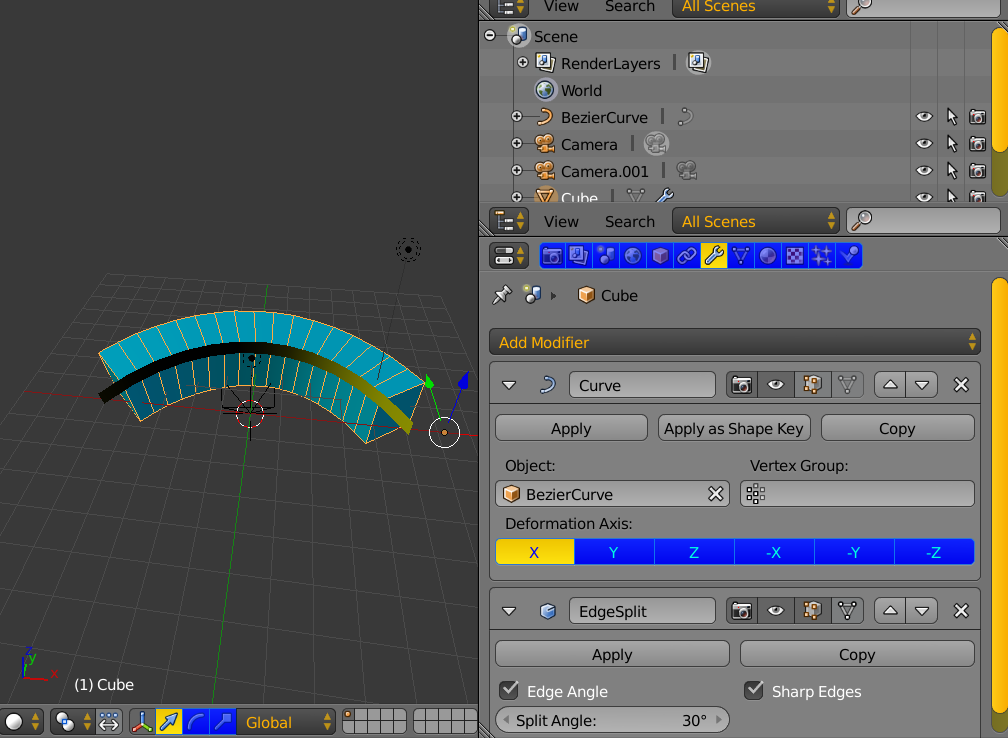
The shape of the object.

enter image description here

  • Cube scaled as appropriate in Edit Mode
  • Loop Cut to provide vertex density to allow the next step to work. The edges are shown above.
  • Curve Modifier.
  • Smooth Shading
  • Edge Split Modifier to keep sharp corner where needed and keep smooth shading where needed
  • I hesitate to comment on material yet I will comment that the dark lines can be achieved with Freestyle which requires more searching and learning.

You can search [Curve Modifier] and [Edge Split]. There will be many matches at BSE.

Hopefully you get more than one answer with different approaches as well.

$\endgroup$
2
  • $\begingroup$ So far it looks good! But I have a few questions. I can't see the BezierCurve, so I don't know its shape or rotation. Also, how did you make it multiple segments? Did you subdivide it? Can you explain how? $\endgroup$ Commented Apr 5, 2016 at 0:09
  • $\begingroup$ Please look again, the Bezier curve is visible, it is the greenish strip. Now that you know more Blender language you may use those terms for other searches. Other helpers can also comment. This answer was provided as a quick starting point. $\endgroup$ Commented Apr 5, 2016 at 0:14

You must log in to answer this question.

Not the answer you're looking for? Browse other questions tagged .