1
$\begingroup$

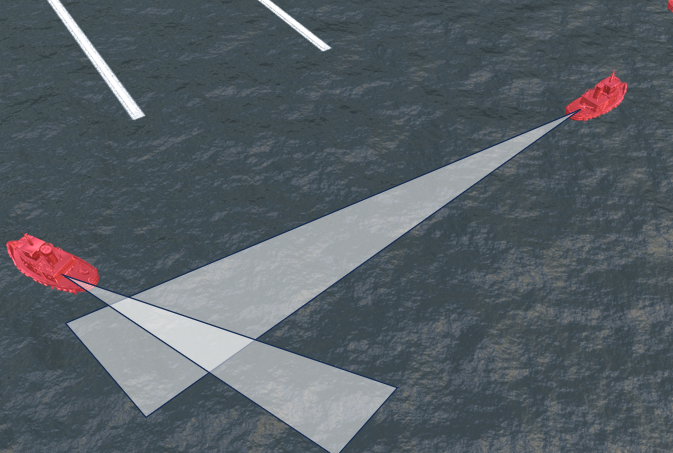
I have results from a scientific simulation of vessels moving around. I also have a trail behind each vessel.

Right now the trail has a tube modifier so it's a 3D mesh, but I can also just have this as points/edges with no faces.

ships and trails

This trail also has a float attribute stored at each point (denoted by the color in the image)

Im trying to find a way to displace or scale the mesh to turn it into a cone/wedge shape, that looks more like a real wake behind the ship. Something like this:

wake

My first thought was simply to displace/scale the faces in their normal direction by this float attribute. Since it varies over the trail, it should end up giving me some kind of conical shape.

But I'm having a hard time achieving this, been messing around with different shader materials and tried in geometry nodes as well, but struggling.

I just want to make this trail look like a wake, or clouds, or something semi-realistic.

Please note the ship movements are not keyframed, so using a dynamic paint approach wont work. I need to find a way to make it look like a wake using it's shape and point attribute.

The closest I was able to get was using geometry nodes, though I can't figure out how to rotate the result about it's own axis to look properly, or to smooth out the "steps":

best attempt

any ideas on how you would do this properly?

$\endgroup$

2 Answers 2

2
$\begingroup$

(Using Blender 3.6.8)

One approach is to move vertices on both side of the wake by a distance function of the point attribute. Without much details about the original mesh geometry, it is assumed in what follows that it is in the (X,Y) plane and "strait" along one local axis (X or Y). So the displacement is applied perpendicularly to this "main" axis.

Results

The top views show the original strait strip (in black), and a copy with the GeometryNodes modifier activated (in orange).
1. For the demo, the Y coordinate is used instead of the original "Time". The Multiply math node is to adjust the wake width, while the Power math node is to create some curvature of the wake rims.
2. The direction perpendicular to the strip "main" axis is computed from the shortest edge of its Bounding Box.
3. The Sign of the projection of a vertex position along this direction (computed with a Dot Product math node) is used to move in opposite directions points on each side of the wake central line.
4. The Offset of each point in the perpendicular direction is proportional to the "Time" stored attribute.

Resources:

$\endgroup$
2
  • $\begingroup$ Note: if the original wakes were curves, the local tangent vector could have been used to align a wake profile perpendicularly to the wake central line, and the radius property could have been used to scale it. The meshed wake would have been generated then by a Curve to Mesh node. This approach can be developed as an other answer if required. $\endgroup$ Commented Apr 25 at 8:26
  • $\begingroup$ not forcing you, but it would be amazing if you were able to add both approaches :) appreciate the suggestion, I'll make an attempt at it $\endgroup$
    – Derek Eden
    Commented Apr 25 at 14:12
0
$\begingroup$

(Using Blender 3.6.8)

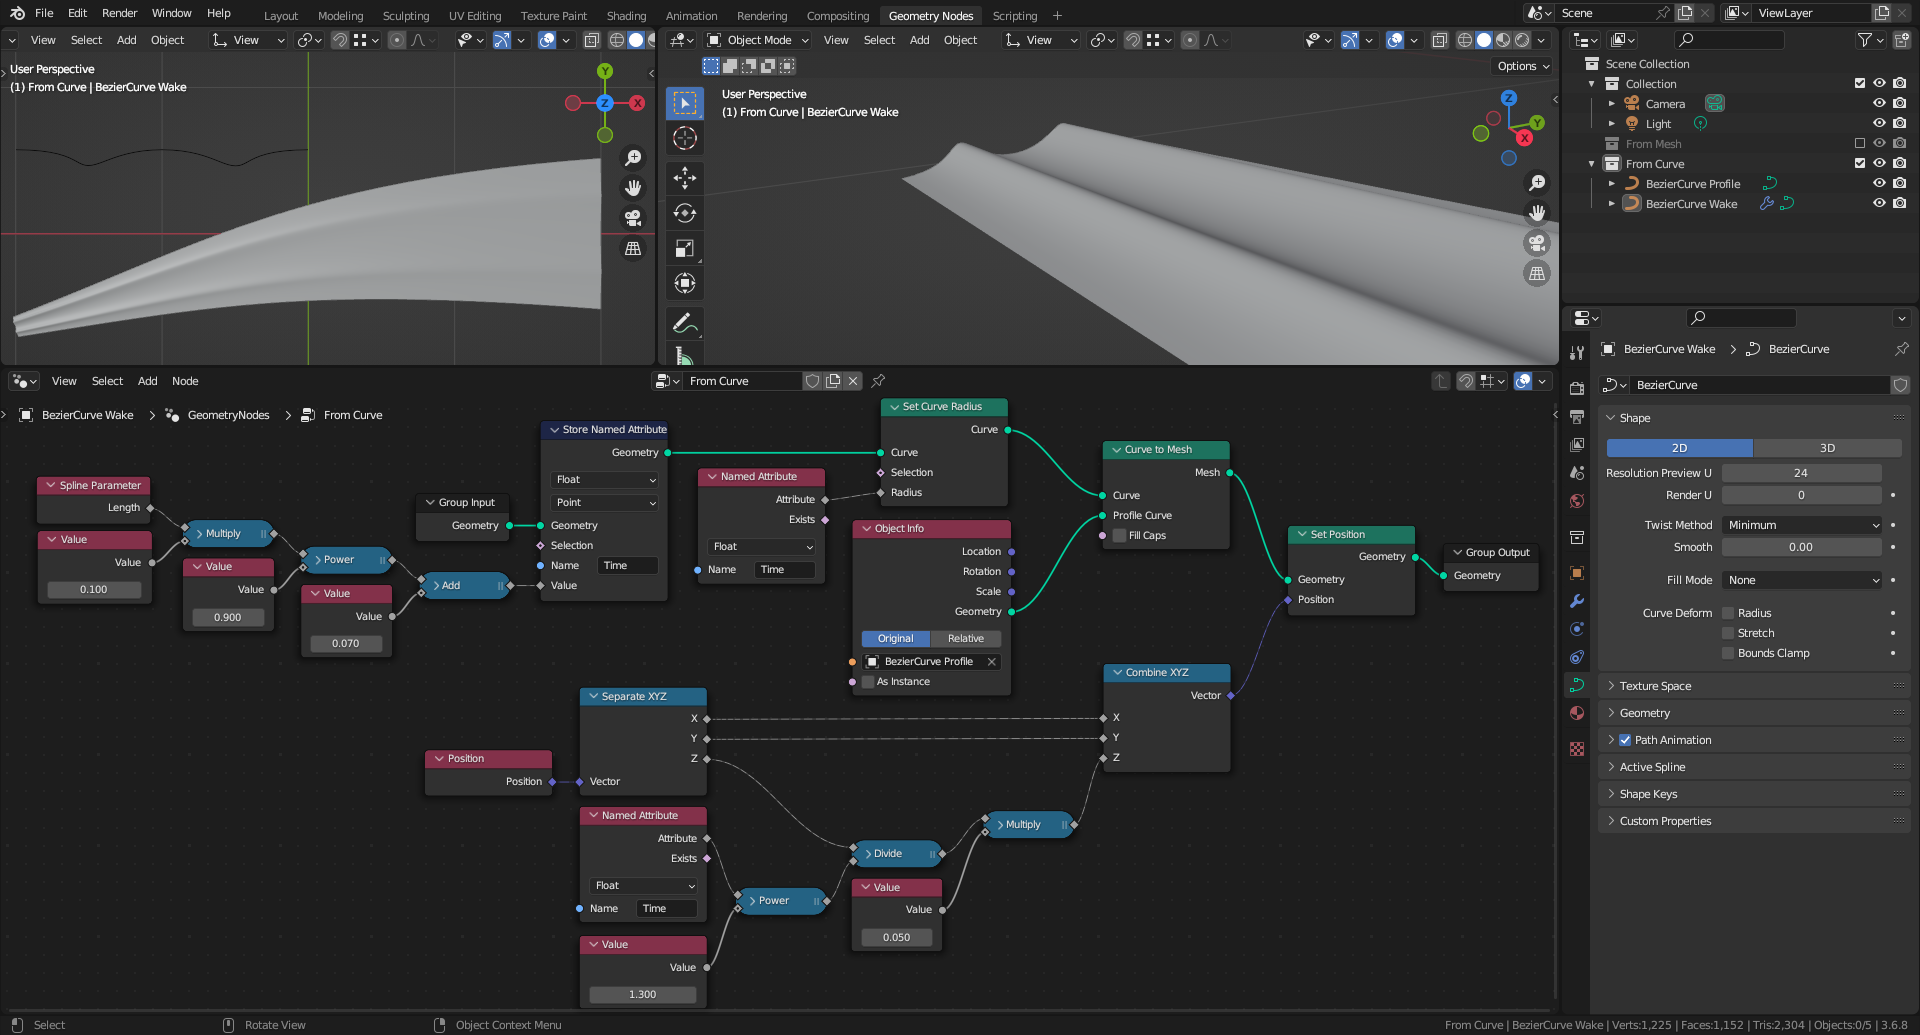
One approach is to define the wake central line with a curve, and the wake profile with an other curve that is "extruded" following the central line. The mesh of the wake is made with a Curve to Mesh node, connecting the wake profile at the Profile Curve socket. The width of the wake is controlled using a Set Curve Radius node.

GN Graph without wake damping

1. The black outline in the top left view is the wake profile (NB: It seems upside-down because of the central line curve tilt).
2. For the demo, the Length along the central curve is used instead of the original "Time". The Multiply math node is to adjust the wake width, while the Power math node is to create some curvature of the wake rims. The Add math node is setting the wake minimal width.
3. The "Time" attribute is used to set the radius, thus the scaling of the wake profile curve, which is recovered through an Object Info node.
4. It is to notice that attributes are transferred from the curve to the mesh in the Point domain by the Curve to Mesh node.

GN graph with wake damping

1. Because the scaling by the radius is uniform, the wake profile aspect ratio is preserved all along the wake.
2. So to reduce the wake height, its Z coordinate is modified by the bottom nodes group. As it is proportional to the "Time" attribute, dividing it by a power larger than 1 of this attribute makes it decreasing as the length increases. The Multiply math node is to adjust the resulting wake height.

Resources:

$\endgroup$
1
  • $\begingroup$ thank you very much for the answers, I ended up accepting the other one only because it was closer to my end application and worked more easily for me $\endgroup$
    – Derek Eden
    Commented Apr 26 at 13:17

You must log in to answer this question.

Not the answer you're looking for? Browse other questions tagged .