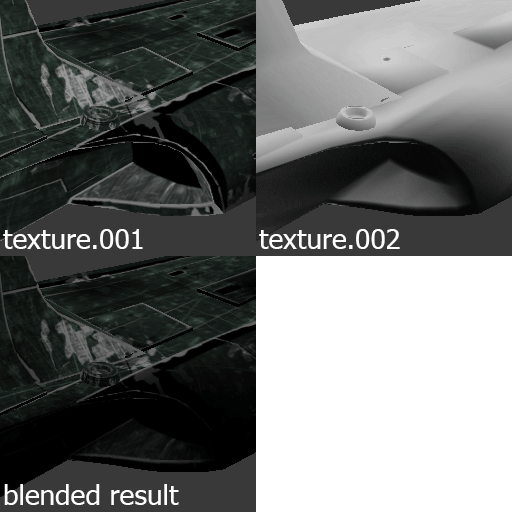
I love the matcap mode in Blender for modelling, because it allows me to get a good idea of the shape of the model I'm working on as the 'lighting' is fixed to the camera and changes as I move it around (similar to the default lighting mode in Maya). However, when I want to view textures, I either have to set the shadeless flag (no lighting), or place lights in the scene, which is both annoying, and static, so it's still quite hard to appreciate the effect the texture is having on the perceived shape of the model. What I would love to have, is a way to have either default lighting that is fixed to the camera, or some way to blend the texture with a white matcap (or any matcap) to simulate that default lighting. Ideally this would be great as a default feature in Blender, but I'll take a workaround for now :)
-
$\begingroup$ You can do this by setting the texture mapping to Normal. See blender.stackexchange.com/a/554/599 $\endgroup$– gandalf3Commented Jan 29, 2015 at 10:18
-
$\begingroup$ Thanks. This is a decent workaround/solution, although it has to be done per material. I added Blender's mc01 matcap texture to the material's texture stack at the top, and set the blend mode to multiply and the material to shadeless. It's best to modify the matcap to have higher contrast, but this works. $\endgroup$– MrFlameyCommented Jan 30, 2015 at 3:08
2 Answers
Ok, so I've found an acceptable workaround thanks to Gandalf3's comment to the question, which references another question that asks how regular materials can be made to work like a matcap. Here is how I set up my material to get both a texture using the main UV map, and camera dependent shading, by blending it with a matcap.

These steps assume you have already created a material and assigned a texture to it in the first (top) texture slot. Also, make sure you are using the GLSL display mode ('n' to open display panel, then select from the 'Shading' section) and are viewing in textured mode ('alt + z'). You needn't have any lights in your scene for this to work.
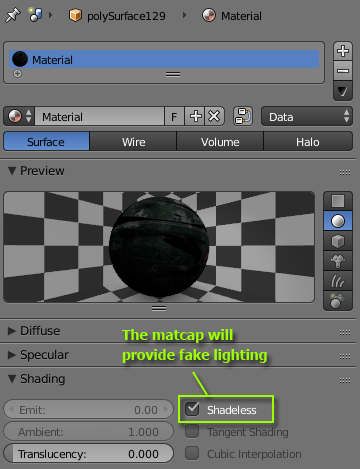
- Check the material's 'Shadeless' parameter. We don't want lighting, because the matcap will be assigned to provide a faked lighting effect that is dependent on the surface normal relative to the camera.

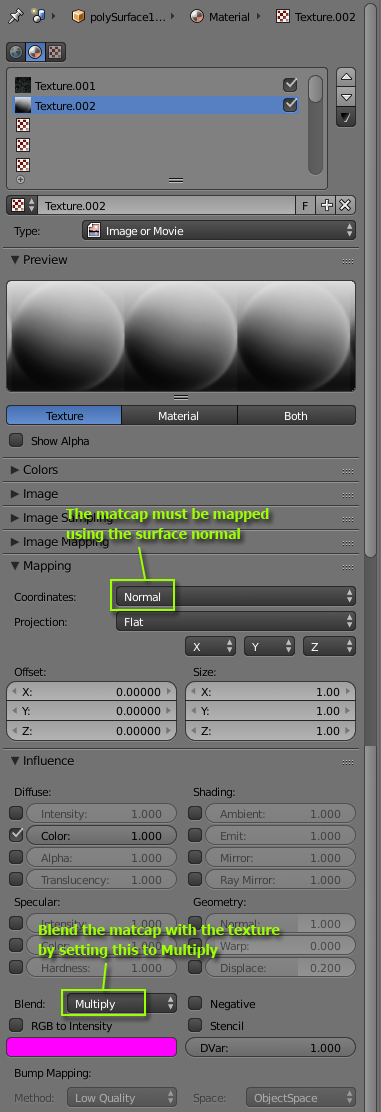
- Add a new texture in slot 2 (below slot 1) and assign a matcap texture. You can find some matcap textures here: https://svn.blender.org/svnroot/bf-blender/trunk/blender/release/datafiles/matcaps/

Set the coordinates of the matcap to 'Normal' in the 'Mapping' section of the texture properties. If you look in the viewport now, it will appear like a regular matcap in shaded mode.
The matcap needs to be blended with the texture, so set the 'Blend' parameter in the 'Influence' section to 'Multiply'.
If you have done this correctly, when you move the camera around, the matcap should provide some kind of lighting to the model, allowing you to see the shape of the model with the texture applied much more clearly. Note that you may need to adjust the matcap to make the lighting effect more obvious. I used the default Blender matcap (mc01.jpg from the link above) and increased the contrast in an image editor to get darker shading.
-
$\begingroup$ Just to add that you can use the internal nodes to mix the textures as separate materials with a "Mix" node so that you can put a "ColorRamp", "RGB Curves" etc. in between the MatCap material and the "Mix" node allowing you to manipulate the MatCap in real-time and with greater control. $\endgroup$– VladimirCommented Apr 4, 2015 at 14:23
As a temporary solution:
Try parenting a spot to your camera.
In object mode select the spot, then ctrl+p.
This should give the effect you're looking for with textured view.
If you use this solution, you could use the outliner view to disable that lamp from rendering.
The drawback is that this only give the effect you need when you're actually looking through the camera.
-
$\begingroup$ As far as I know, the regular scene camera is not selectable or modifiable - it's certainly not visible in the outliner; I would have tried parenting a light to it otherwise. Controlling arbitrary cameras in the same way as the scene camera is something I would like to be able to do, but haven't figured out. $\endgroup$– MrFlameyCommented Jan 30, 2015 at 2:42
