added 87 characters in body
Source Link

enter image description here

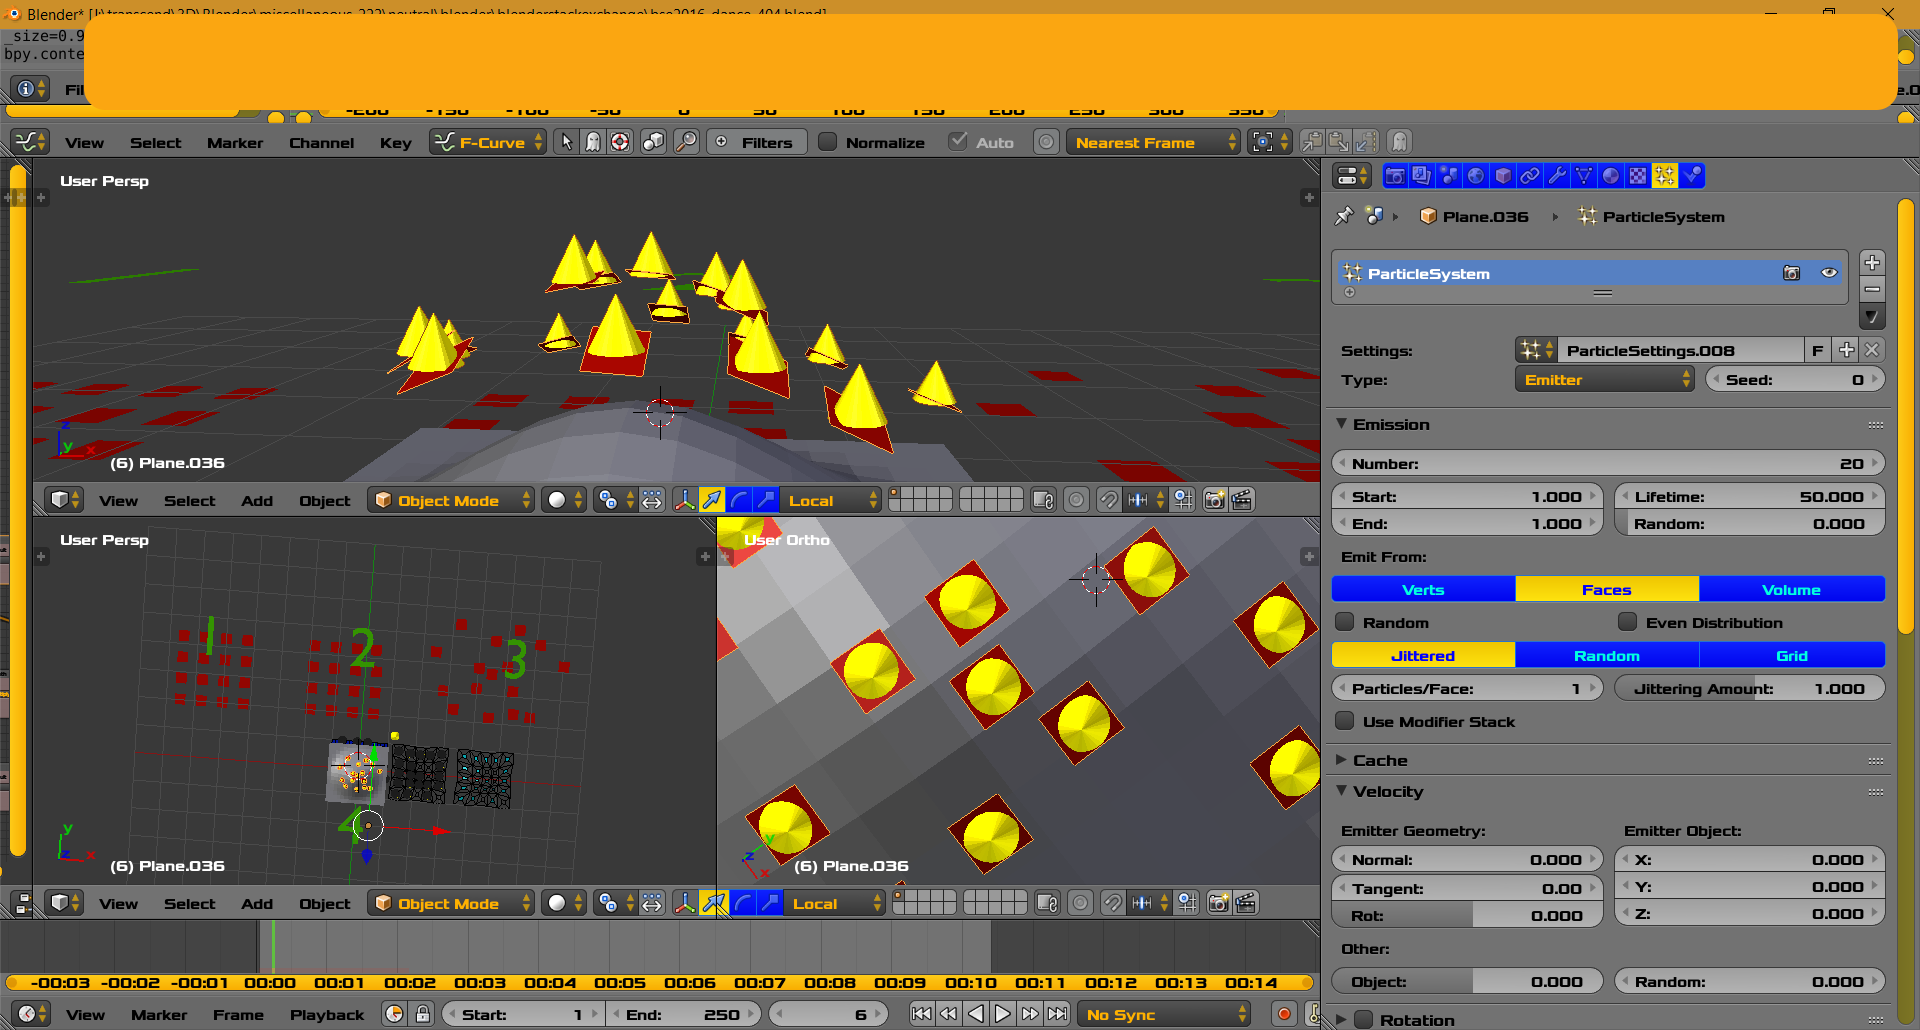
In the image above are green numbers 1-4

  1. Small Red Plane with two array modifiers. Appears as many red squares.

  2. Array ModfiersModifiers applied. Single Object. Edit Mode. Separate loose parts. Now many separate red square objects. Many different methods can be used to create multiple red squares including Shift-D

  3. Proportional Editing Object Mode. Moving object planes in XY only. No distortion.

  4. Join separate planes into one mesh. Space search [Join]. Shrink Wrap Modifier. Apply Shrink Wrap. Add a single Particle System.

The above steps are Artwork via the proportional edit. This may feel more natural for some Artists. We are saving computer resources by not using Make Real on complex objects. Your computer, your choice. Proportional edit can be done in edit mode if rectangle distortion is acceptable.

Create a Second Particle Surface

enter image description here


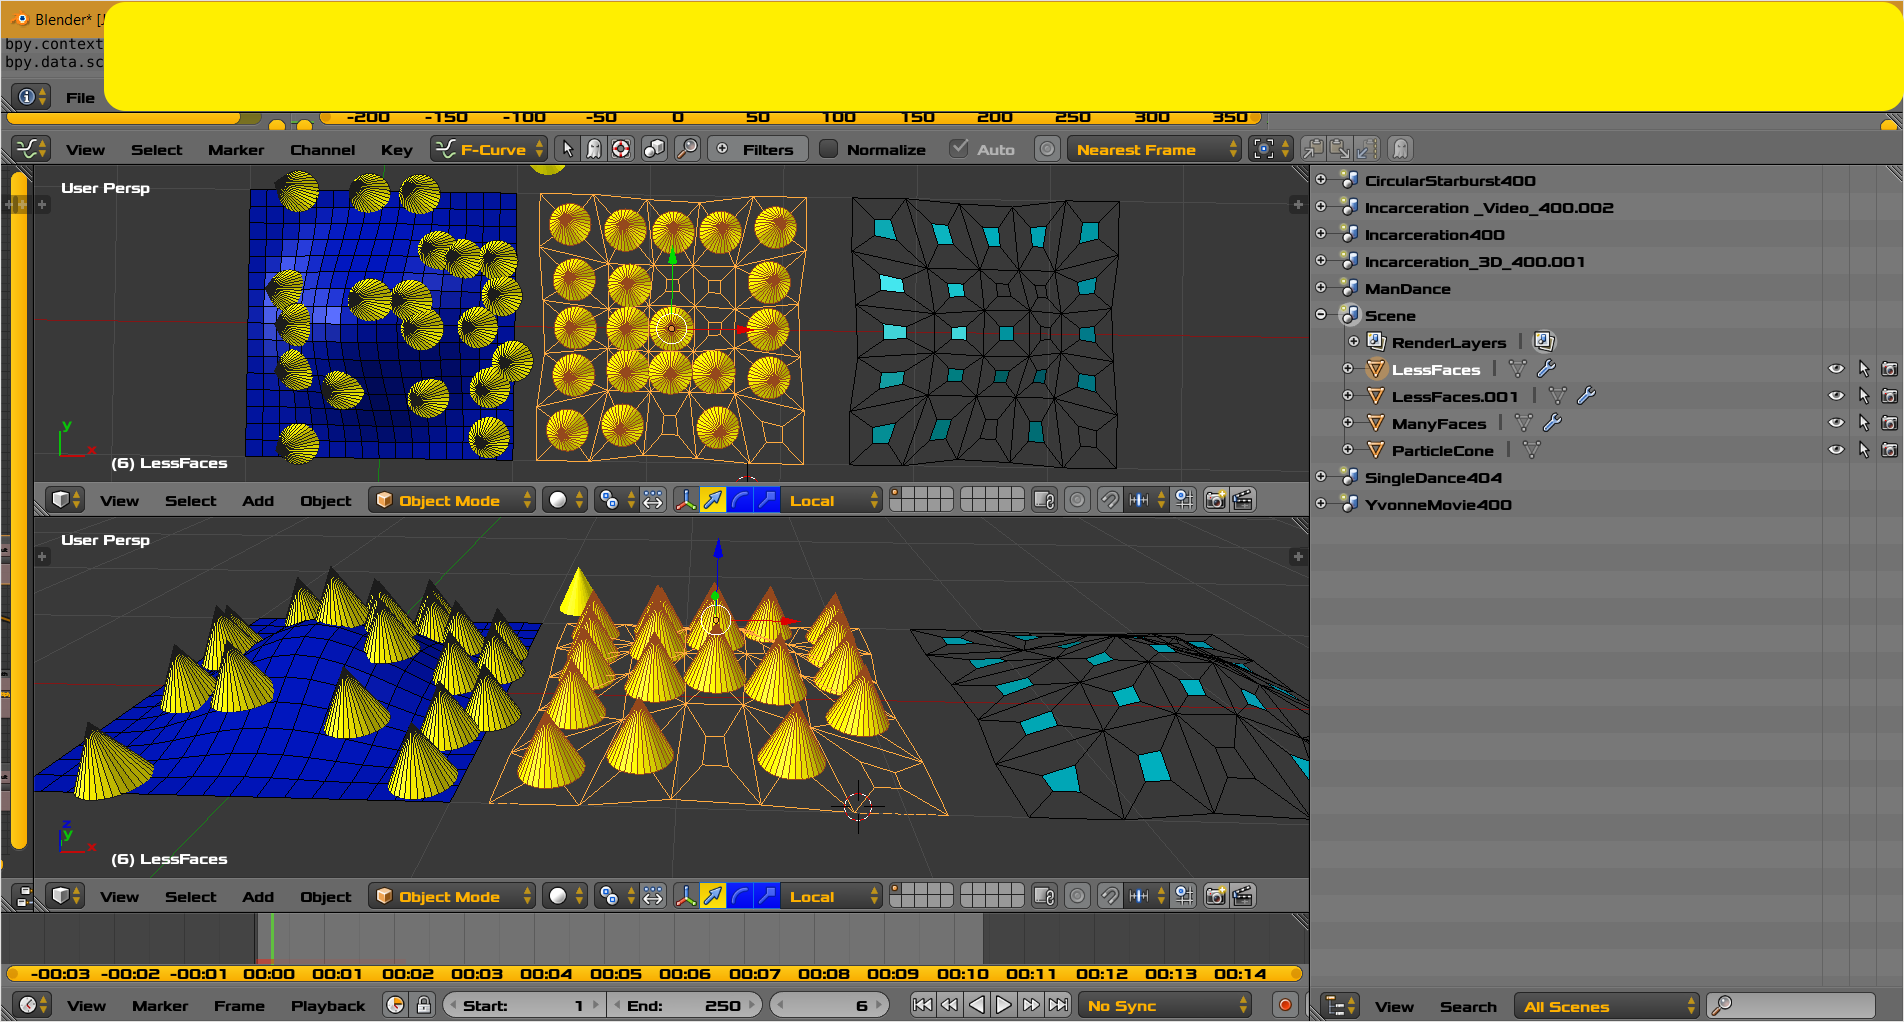
Second method of creating another surface . In the image above the dark blue mesh on the left has a particle system with particles overlapping. On the far right is a mesh with shape originating from the dark blue surface and showing faces and other spacing vertices. The middle mesh shows a successful particle system with no overlap of particles. Click image to see detail.

  • Original Plane Exists.

  • New Plane. Loop Cut in Both Directions Coarsely. The more loop cuts you have the more vertex density and more final isolated rectangles you will have. More vertex density allows more flexibility. This is a technical explanation not. You have the Artistic freedom. Place New plane Above Old plane. Shrink Wrap Modifier is used with new plane with settings suited to your tastes. Apply Shrink Wrap. Now new plane has general shape of old with less vertices

  • New Plane in edit mode. Face Selection Mode. Median Scale Mode. Select all. Extrude [Individual] Faces from Menu. No Movement. Accept operation. Scale Small. Invert Selection. Delete Faces Only. You should be left with islands of faces as shown above. Note this a very technical sequence of steps. No artistic effort.

  • You can also create spaced grid first and then Shrink Wrap.

  • Inspect and Test. If desired manually or randomly select from menu, more faces. Delete faces only.

  • In object mode you can created many rectangle objects and proportionally move them in object mode then join them to form a mesh.

  • You can also consider creating rectangle particles. Particle Pane ... then make Particles real. Join all particles. Then delete rectangle to your tastes. Add back particle system with artistic particles. Not shown ... yet. My proposed answer time has expired at the moment.

  • You can also consider weight painting. Not Shown.

  • Of course I may have left out some steps. Please excuse those errors.

enter image description here

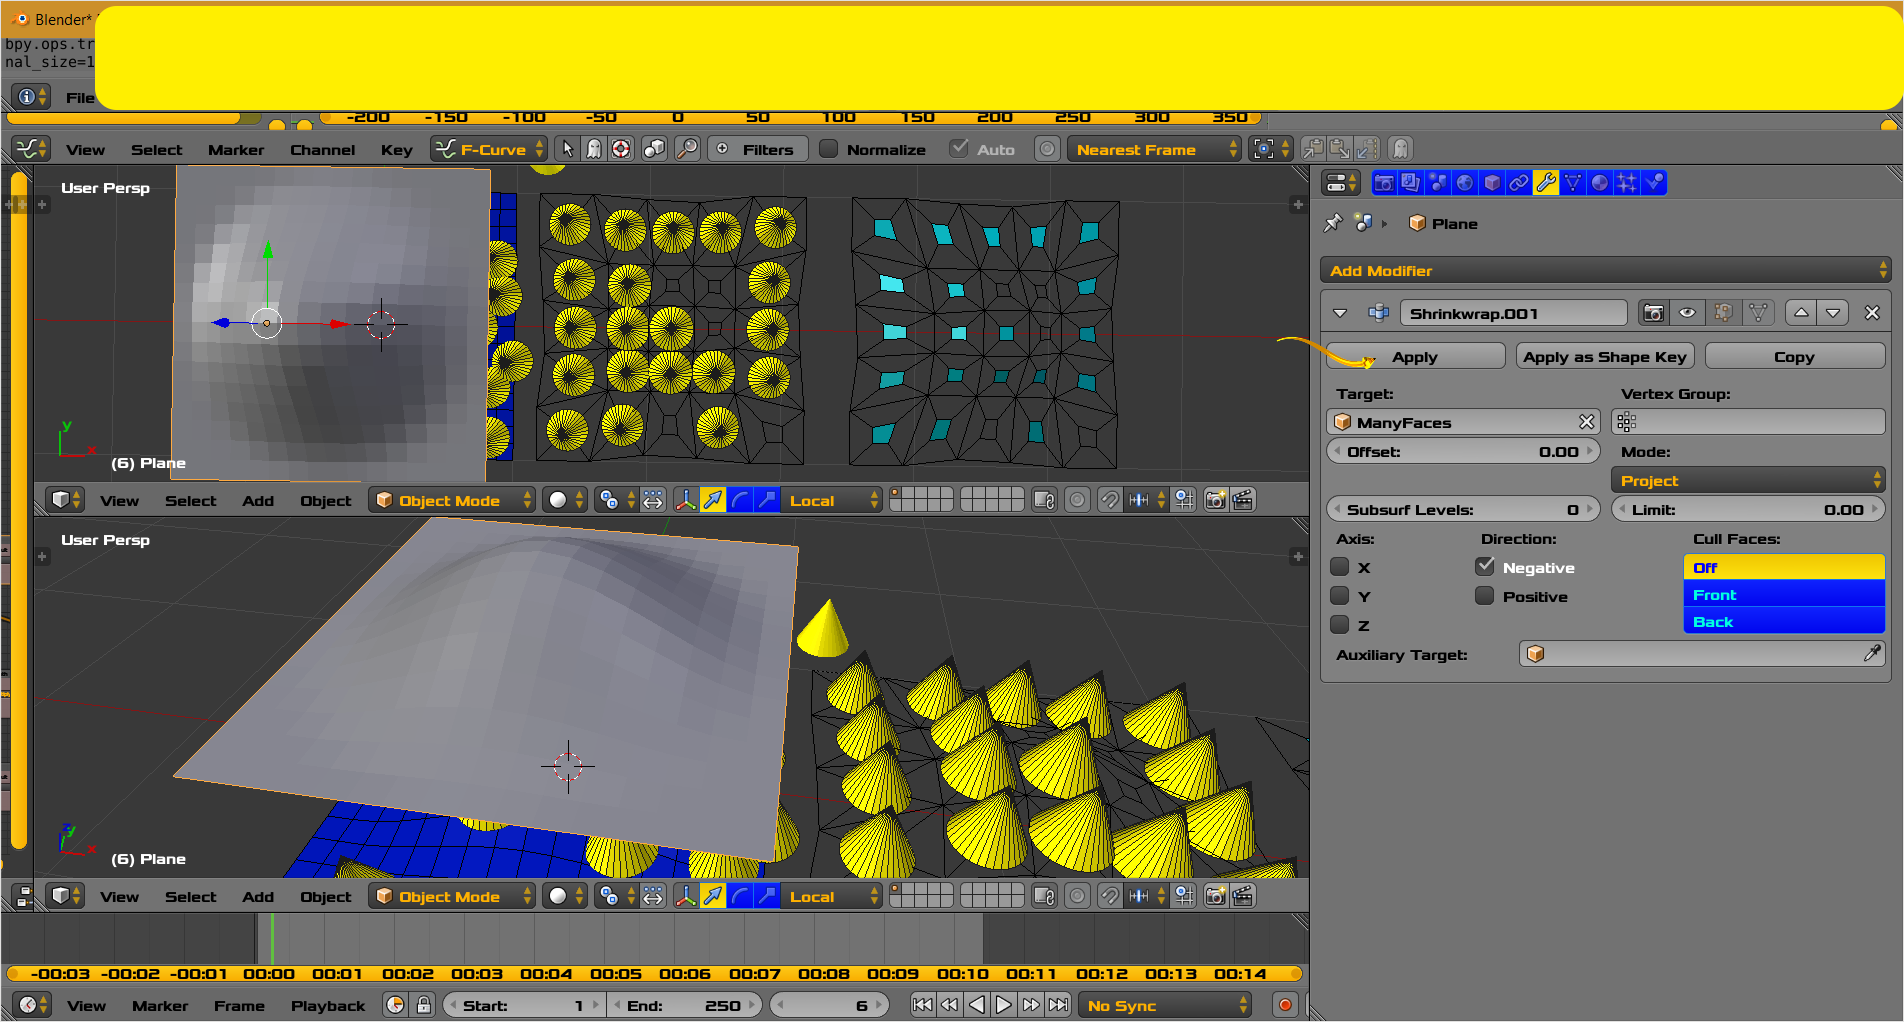
  • In the image above are the Shrink Wrap Modifier settings. In order to get reasonable documentation images the eye visibility setting is inactive. Documentation and Actual use create a few steps I have omitted without a video.

enter image description here

In the image above are green numbers 1-4

  1. Small Red Plane with two array modifiers. Appears as many red squares.

  2. Array Modfiers applied. Single Object. Edit Mode. Separate loose parts. Now many separate red square objects. Many different methods can be used to create multiple red squares including Shift-D

  3. Proportional Editing Object Mode. Moving object planes in XY only. No distortion.

  4. Join separate planes into one mesh. Space search [Join]. Shrink Wrap Modifier. Apply Shrink Wrap. Add a single Particle System.

The above steps are Artwork via the proportional edit. This may feel more natural for some Artists. We are saving computer resources by not using Make Real on complex objects. Your computer, your choice. Proportional edit can be done in edit mode if rectangle distortion is acceptable.

Create a Second Particle Surface

enter image description here


Second method of creating another surface . In the image above the dark blue mesh on the left has a particle system with particles overlapping. On the far right is a mesh with shape originating from the dark blue surface and showing faces and other spacing vertices. The middle mesh shows a successful particle system with no overlap of particles. Click image to see detail.

  • Original Plane Exists.

  • New Plane. Loop Cut in Both Directions Coarsely. The more loop cuts you have the more vertex density and more final isolated rectangles you will have. More vertex density allows more flexibility. This is a technical explanation not. You have the Artistic freedom. Place New plane Above Old plane. Shrink Wrap Modifier is used with new plane with settings suited to your tastes. Apply Shrink Wrap. Now new plane has general shape of old with less vertices

  • New Plane in edit mode. Face Selection Mode. Median Scale Mode. Select all. Extrude [Individual] Faces from Menu. No Movement. Accept operation. Scale Small. Invert Selection. Delete Faces Only. You should be left with islands of faces as shown above. Note this a very technical sequence of steps. No artistic effort.

  • You can also create spaced grid first and then Shrink Wrap.

  • Inspect and Test. If desired manually or randomly select from menu, more faces. Delete faces only.

  • In object mode you can created many rectangle objects and proportionally move them in object mode then join them to form a mesh.

  • You can also consider creating rectangle particles. Particle Pane ... then make Particles real. Join all particles. Then delete rectangle to your tastes. Add back particle system with artistic particles. Not shown ... yet. My proposed answer time has expired at the moment.

  • You can also consider weight painting. Not Shown.

  • Of course I may have left out some steps. Please excuse those errors.

enter image description here

  • In the image above are the Shrink Wrap Modifier settings. In order to get reasonable documentation images the eye visibility setting is inactive. Documentation and Actual use create a few steps I have omitted without a video.
enter image description here

In the image above are green numbers 1-4

  1. Small Red Plane with two array modifiers. Appears as many red squares.

  2. Array Modifiers applied. Single Object. Edit Mode. Separate loose parts. Now many separate red square objects. Many different methods can be used to create multiple red squares including Shift-D

  3. Proportional Editing Object Mode. Moving object planes in XY only. No distortion.

  4. Join separate planes into one mesh. Space search [Join]. Shrink Wrap Modifier. Apply Shrink Wrap. Add a single Particle System.

The above steps are Artwork via the proportional edit. This may feel more natural for some Artists. We are saving computer resources by not using Make Real on complex objects. Your computer, your choice. Proportional edit can be done in edit mode if rectangle distortion is acceptable.

Create a Second Particle Surface

enter image description here


Second method of creating another surface . In the image above the dark blue mesh on the left has a particle system with particles overlapping. On the far right is a mesh with shape originating from the dark blue surface and showing faces and other spacing vertices. The middle mesh shows a successful particle system with no overlap of particles. Click image to see detail.

  • Original Plane Exists.

  • New Plane. Loop Cut in Both Directions Coarsely. The more loop cuts you have the more vertex density and more final isolated rectangles you will have. More vertex density allows more flexibility. This is a technical explanation not. You have the Artistic freedom. Place New plane Above Old plane. Shrink Wrap Modifier is used with new plane with settings suited to your tastes. Apply Shrink Wrap. Now new plane has general shape of old with less vertices

  • New Plane in edit mode. Face Selection Mode. Median Scale Mode. Select all. Extrude [Individual] Faces from Menu. No Movement. Accept operation. Scale Small. Invert Selection. Delete Faces Only. You should be left with islands of faces as shown above. Note this a very technical sequence of steps. No artistic effort.

  • You can also create spaced grid first and then Shrink Wrap.

  • Inspect and Test. If desired manually or randomly select from menu, more faces. Delete faces only.

  • In object mode you can created many rectangle objects and proportionally move them in object mode then join them to form a mesh.

  • You can also consider creating rectangle particles. Particle Pane ... then make Particles real. Join all particles. Then delete rectangle to your tastes. Add back particle system with artistic particles. Not shown ... yet. My proposed answer time has expired at the moment.

  • You can also consider weight painting. Not Shown.

  • Of course I may have left out some steps. Please excuse those errors.

enter image description here

  • In the image above are the Shrink Wrap Modifier settings. In order to get reasonable documentation images the eye visibility setting is inactive. Documentation and Actual use create a few steps I have omitted without a video.
added 87 characters in body
Source Link

enter image description here

In the image above are green numbers 1-4

  1. Small Red Plane with two array modifiers. Appears as many red squares.

  2. Array Modfiers applied. Single Object. Edit Mode. Separate loose parts. Now many separate red square objects. Many different methods can be used to create multiple red squares including Shift-D

  3. Proportional Editing Object Mode. Moving object planes in XY only. No distortion.

  4. Join separate planes into one mesh. Space search [Join]. Shrink Wrap Modifier. Apply Shrink Wrap. Add a single Particle System.

The above steps are Artwork via the proportional edit. This may feel more natural for some Artists. We are saving computer resources by not using Make Real on complex objects. Your computer, your choice. Proportional edit can be done in edit mode if rectangle distortion is acceptable.

Create a Second Particle Surface

enter image description here


Second method of creating another surface . In the image above the dark blue mesh on the left has a particle system with particles overlapping. On the far right is a mesh with shape originating from the dark blue surface and showing faces and other spacing vertices. The middle mesh shows a successful particle system with no overlap of particles. Click image to see detail.

  • Original Plane Exists.

  • New Plane. Loop Cut in Both Directions Coarsely. The more loop cuts you have the more vertex density and more final isolated rectangles you will have. More vertex density allows more flexibility. This is a technical explanation not. You have the Artistic freedom. Place New plane Above Old plane. Shrink Wrap Modifier is used with new plane with settings suited to your tastes. Apply Shrink Wrap. Now new plane has general shape of old with less vertices

  • New Plane in edit mode. Face Selection Mode. Median Scale Mode. Select all. Extrude [Individual] Faces from Menu. No Movement. Accept operation. Scale Small. Invert Selection. Delete Faces Only. You should be left with islands of faces as shown above. Note this a very technical sequence of steps. No artistic effort.

  • You can also create spaced grid first and then Shrink Wrap.

  • Inspect and Test. If desired manually or randomly select from menu, more faces. Delete faces only.

  • In object mode you can created many rectangle objects and proportionally move them in object mode then join them to form a mesh.

  • You can also consider creating rectangle particles. Particle Pane ... then make Particles real. Join all particles. Then delete rectangle to your tastes. Add back particle system with artistic particles. Not shown ... yet. My proposed answer time has expired at the moment.

  • You can also consider weight painting. Not Shown.

  • Of course I may have left out some steps. Please excuse those errors.

enter image description here

  • In the image above are the Shrink Wrap Modifier settings. In order to get reasonable documentation images the eye visibility setting is inactive. Documentation and Actual use create a few steps I have omitted without a video.

enter image description here

In the image above are green numbers 1-4

  1. Small Red Plane with two array modifiers. Appears as many red squares.

  2. Array Modfiers applied. Single Object. Edit Mode. Separate loose parts. Now many separate red square objects. Many different methods can be used to create multiple red squares including Shift-D

  3. Proportional Editing Object Mode. Moving object planes in XY only. No distortion.

  4. Join separate planes into one mesh. Space search [Join]. Shrink Wrap Modifier. Apply Shrink Wrap. Add a single Particle System.

The above steps are Artwork via the proportional edit. This may feel more natural for some Artists. We are saving computer resources by not using Make Real on complex objects. Your computer, your choice.

Create a Second Particle Surface

enter image description here


Second method of creating another surface . In the image above the dark blue mesh on the left has a particle system with particles overlapping. On the far right is a mesh with shape originating from the dark blue surface and showing faces and other spacing vertices. The middle mesh shows a successful particle system with no overlap of particles. Click image to see detail.

  • Original Plane Exists.

  • New Plane. Loop Cut in Both Directions Coarsely. The more loop cuts you have the more vertex density and more final isolated rectangles you will have. More vertex density allows more flexibility. This is a technical explanation not. You have the Artistic freedom. Place New plane Above Old plane. Shrink Wrap Modifier is used with new plane with settings suited to your tastes. Apply Shrink Wrap. Now new plane has general shape of old with less vertices

  • New Plane in edit mode. Face Selection Mode. Median Scale Mode. Select all. Extrude [Individual] Faces from Menu. No Movement. Accept operation. Scale Small. Invert Selection. Delete Faces Only. You should be left with islands of faces as shown above. Note this a very technical sequence of steps. No artistic effort.

  • You can also create spaced grid first and then Shrink Wrap.

  • Inspect and Test. If desired manually or randomly select from menu, more faces. Delete faces only.

  • In object mode you can created many rectangle objects and proportionally move them in object mode then join them to form a mesh.

  • You can also consider creating rectangle particles. Particle Pane ... then make Particles real. Join all particles. Then delete rectangle to your tastes. Add back particle system with artistic particles. Not shown ... yet. My proposed answer time has expired at the moment.

  • You can also consider weight painting. Not Shown.

  • Of course I may have left out some steps. Please excuse those errors.

enter image description here

  • In the image above are the Shrink Wrap Modifier settings. In order to get reasonable documentation images the eye visibility setting is inactive. Documentation and Actual use create a few steps I have omitted without a video.

enter image description here

In the image above are green numbers 1-4

  1. Small Red Plane with two array modifiers. Appears as many red squares.

  2. Array Modfiers applied. Single Object. Edit Mode. Separate loose parts. Now many separate red square objects. Many different methods can be used to create multiple red squares including Shift-D

  3. Proportional Editing Object Mode. Moving object planes in XY only. No distortion.

  4. Join separate planes into one mesh. Space search [Join]. Shrink Wrap Modifier. Apply Shrink Wrap. Add a single Particle System.

The above steps are Artwork via the proportional edit. This may feel more natural for some Artists. We are saving computer resources by not using Make Real on complex objects. Your computer, your choice. Proportional edit can be done in edit mode if rectangle distortion is acceptable.

Create a Second Particle Surface

enter image description here


Second method of creating another surface . In the image above the dark blue mesh on the left has a particle system with particles overlapping. On the far right is a mesh with shape originating from the dark blue surface and showing faces and other spacing vertices. The middle mesh shows a successful particle system with no overlap of particles. Click image to see detail.

  • Original Plane Exists.

  • New Plane. Loop Cut in Both Directions Coarsely. The more loop cuts you have the more vertex density and more final isolated rectangles you will have. More vertex density allows more flexibility. This is a technical explanation not. You have the Artistic freedom. Place New plane Above Old plane. Shrink Wrap Modifier is used with new plane with settings suited to your tastes. Apply Shrink Wrap. Now new plane has general shape of old with less vertices

  • New Plane in edit mode. Face Selection Mode. Median Scale Mode. Select all. Extrude [Individual] Faces from Menu. No Movement. Accept operation. Scale Small. Invert Selection. Delete Faces Only. You should be left with islands of faces as shown above. Note this a very technical sequence of steps. No artistic effort.

  • You can also create spaced grid first and then Shrink Wrap.

  • Inspect and Test. If desired manually or randomly select from menu, more faces. Delete faces only.

  • In object mode you can created many rectangle objects and proportionally move them in object mode then join them to form a mesh.

  • You can also consider creating rectangle particles. Particle Pane ... then make Particles real. Join all particles. Then delete rectangle to your tastes. Add back particle system with artistic particles. Not shown ... yet. My proposed answer time has expired at the moment.

  • You can also consider weight painting. Not Shown.

  • Of course I may have left out some steps. Please excuse those errors.

enter image description here

  • In the image above are the Shrink Wrap Modifier settings. In order to get reasonable documentation images the eye visibility setting is inactive. Documentation and Actual use create a few steps I have omitted without a video.

added 765 characters in body
Source Link

enter image description here

In the image above are green numbers 1-4

  1. Small Red Plane with two array modifiers. Appears as many red squares.

  2. Array Modfiers applied. Single Object. Edit Mode. Separate loose parts. Now many separate red square objects. Many different methods can be used to create multiple red squares including Shift-D

  3. Proportional Editing Object Mode. Moving object planes in XY only. No distortion.

  4. Join separate planes into one mesh. Space search [Join]. Shrink Wrap Modifier. Apply Shrink Wrap. Add a single Particle System.

The above steps are Artwork via the proportional edit. WeThis may feel more natural for some Artists. We are saving computer resources by not using Make Real on complex objects. Your computer, your choice.

Create a Second Particle Surface

enter image description here


Second method of creating another surface . In the image above the dark blue mesh on the left has a particle system with particles overlapping. On the far right is a mesh with shape originating from the dark blue surface and showing faces and other spacing vertices. The middle mesh shows a successful particle system with no overlap of particles. Click image to see detail.

  • Original Plane Exists.

  • New Plane. Loop Cut in Both Directions Coarsely. The more loop cuts you have the more vertex density and more final isolated rectangles you will have. More vertex density allows more flexibility. This is a technical explanation not. You have the Artistic freedom. Place New plane Above Old plane. Shrink Wrap Modifier is used with new plane with settings suited to your tastes. Apply Shrink Wrap. Now new plane has general shape of old with less vertices

  • New Plane in edit mode. Face Selection Mode. Median Scale Mode. Select all. Extrude [Individual] Faces from Menu. No Movement. Accept operation. Scale Small. Invert Selection. Delete Faces Only. You should be left with islands of faces as shown above. Note this a very technical sequence of steps. No artistic effort.

  • You can also create spaced grid first and then Shrink Wrap.

  • Inspect and Test. If desired manually or randomly select from menu, more faces. Delete faces only.

  • In object mode you can created many rectangle objects and proportionally move them in object mode then join them to form a mesh.

  • You can also consider creating rectangle particles. Particle Pane ... then make Particles real. Join all particles. Then delete rectangle to your tastes. Add back particle system with artistic particles. Not shown ... yet. My proposed answer time has expired at the moment.

  • You can also consider weight painting. Not Shown.

  • Of course I may have left out some steps. Please excuse those errors.

enter image description here

  • In the image above are the Shrink Wrap Modifier settings. In order to get reasonable documentation images the eye visibility setting is inactive. Documentation and Actual use create a few steps I have omitted without a video.

enter image description here

In the image above are green numbers 1-4

  1. Small Red Plane with two array modifiers. Appears as many red squares.

  2. Array Modfiers applied. Single Object. Edit Mode. Separate loose parts. Now many separate red square objects.

  3. Proportional Editing Object Mode. Moving object planes in XY only. No distortion.

  4. Join separate planes into one mesh. Space search [Join]. Shrink Wrap Modifier. Apply Shrink Wrap. Add a single Particle System.

The above steps are Artwork via the proportional edit. We are saving computer resources by not using Make Real on complex objects. Your computer, your choice.

Create a Second Particle Surface

enter image description here


Second method of creating another surface . In the image above the dark blue mesh on the left has a particle system with particles overlapping. On the far right is a mesh with shape originating from the dark blue surface and showing faces and other spacing vertices. The middle mesh shows a successful particle system with no overlap of particles. Click image to see detail.

  • Original Plane Exists.

  • New Plane. Loop Cut in Both Directions Coarsely. The more loop cuts you have the more vertex density and more final isolated rectangles you will have. More vertex density allows more flexibility. This is a technical explanation not. You have the Artistic freedom. Place New plane Above Old plane. Shrink Wrap Modifier is used with new plane with settings suited to your tastes. Apply Shrink Wrap. Now new plane has general shape of old with less vertices

  • New Plane in edit mode. Face Selection Mode. Median Scale Mode. Select all. Extrude [Individual] Faces from Menu. No Movement. Accept operation. Scale Small. Invert Selection. Delete Faces Only. You should be left with islands of faces as shown above. Note this a very technical sequence of steps. No artistic effort.

  • You can also create spaced grid first and then Shrink Wrap.

  • Inspect and Test. If desired manually or randomly select from menu, more faces. Delete faces only.

  • In object mode you can created many rectangle objects and proportionally move them in object mode then join them to form a mesh.

  • You can also consider creating rectangle particles. Particle Pane ... then make Particles real. Join all particles. Then delete rectangle to your tastes. Add back particle system with artistic particles. Not shown ... yet. My proposed answer time has expired at the moment.

  • You can also consider weight painting. Not Shown.

  • Of course I may have left out some steps. Please excuse those errors.

enter image description here

  • In the image above are the Shrink Wrap Modifier settings. In order to get reasonable documentation images the eye visibility setting is inactive. Documentation and Actual use create a few steps I have omitted without a video.

enter image description here

In the image above are green numbers 1-4

  1. Small Red Plane with two array modifiers. Appears as many red squares.

  2. Array Modfiers applied. Single Object. Edit Mode. Separate loose parts. Now many separate red square objects. Many different methods can be used to create multiple red squares including Shift-D

  3. Proportional Editing Object Mode. Moving object planes in XY only. No distortion.

  4. Join separate planes into one mesh. Space search [Join]. Shrink Wrap Modifier. Apply Shrink Wrap. Add a single Particle System.

The above steps are Artwork via the proportional edit. This may feel more natural for some Artists. We are saving computer resources by not using Make Real on complex objects. Your computer, your choice.

Create a Second Particle Surface

enter image description here


Second method of creating another surface . In the image above the dark blue mesh on the left has a particle system with particles overlapping. On the far right is a mesh with shape originating from the dark blue surface and showing faces and other spacing vertices. The middle mesh shows a successful particle system with no overlap of particles. Click image to see detail.

  • Original Plane Exists.

  • New Plane. Loop Cut in Both Directions Coarsely. The more loop cuts you have the more vertex density and more final isolated rectangles you will have. More vertex density allows more flexibility. This is a technical explanation not. You have the Artistic freedom. Place New plane Above Old plane. Shrink Wrap Modifier is used with new plane with settings suited to your tastes. Apply Shrink Wrap. Now new plane has general shape of old with less vertices

  • New Plane in edit mode. Face Selection Mode. Median Scale Mode. Select all. Extrude [Individual] Faces from Menu. No Movement. Accept operation. Scale Small. Invert Selection. Delete Faces Only. You should be left with islands of faces as shown above. Note this a very technical sequence of steps. No artistic effort.

  • You can also create spaced grid first and then Shrink Wrap.

  • Inspect and Test. If desired manually or randomly select from menu, more faces. Delete faces only.

  • In object mode you can created many rectangle objects and proportionally move them in object mode then join them to form a mesh.

  • You can also consider creating rectangle particles. Particle Pane ... then make Particles real. Join all particles. Then delete rectangle to your tastes. Add back particle system with artistic particles. Not shown ... yet. My proposed answer time has expired at the moment.

  • You can also consider weight painting. Not Shown.

  • Of course I may have left out some steps. Please excuse those errors.

enter image description here

  • In the image above are the Shrink Wrap Modifier settings. In order to get reasonable documentation images the eye visibility setting is inactive. Documentation and Actual use create a few steps I have omitted without a video.

added 765 characters in body
Source Link
Loading
added 201 characters in body
Source Link
Loading
added 297 characters in body
Source Link
Loading
added 350 characters in body
Source Link
Loading
added 78 characters in body
Source Link
Loading
added 44 characters in body
Source Link
Loading
added 258 characters in body
Source Link
Loading
Source Link
Loading