replaced http://blender.stackexchange.com/ with https://blender.stackexchange.com/
Source Link

From my answer herehere, you can create a bounding cube around an object:

  1. Select the target object and press CtrlShiftAltC > Origin to goemetry, and then press F6 and select bounds center.
  1. With the target object selected, press ShiftS> Cursor to selected to move the cursor to the objects origin.

  2. Add a cube to be the bounding box. It will automatically be centered at the 3D cursor, which is snapped to the target object's origin point.

  3. Copy the Dimension and Rotation values from the target object to the bounding cube. These values are located on the Properties region (N in the 3D view):

enter image description here

You can quickly copy and paste values by hovering over the number field and pressing CtrlC/CtrlV accordingly.

Since this process of copying and pasting the values of each channel can be a bit tedious, you can use a quick bit of python to do this for you:

    import bpy

    active = bpy.context.active_object
    selected = bpy.context.selected_objects

    for obj in selected:
        obj.dimensions = active.dimensions
  1. Parent the bounding box to the target object so the relative location, rotation, and scale is kept the same. You can also set the bounding cube's Draw type to Wire in Properties > Object > Display > Maximum Draw Type.

This processes could be automated in python:

import bpy

selected = bpy.context.selected_objects

for obj in selected:
    #ensure origin is centered on bounding box center
    bpy.ops.object.origin_set(type='ORIGIN_GEOMETRY', center='BOUNDS')
    #create a cube for the bounding box
    bpy.ops.mesh.primitive_cube_add() 
    #our new cube is now the active object, so we can keep track of it in a variable:
    bound_box = bpy.context.active_object 

    #copy transforms
    bound_box.dimensions = obj.dimensions
    bound_box.location = obj.location
    bound_box.rotation_euler = obj.rotation_euler

This adds a bounding box object for every selected object.

From my answer here, you can create a bounding cube around an object:

  1. Select the target object and press CtrlShiftAltC > Origin to goemetry, and then press F6 and select bounds center.
  1. With the target object selected, press ShiftS> Cursor to selected to move the cursor to the objects origin.

  2. Add a cube to be the bounding box. It will automatically be centered at the 3D cursor, which is snapped to the target object's origin point.

  3. Copy the Dimension and Rotation values from the target object to the bounding cube. These values are located on the Properties region (N in the 3D view):

enter image description here

You can quickly copy and paste values by hovering over the number field and pressing CtrlC/CtrlV accordingly.

Since this process of copying and pasting the values of each channel can be a bit tedious, you can use a quick bit of python to do this for you:

    import bpy

    active = bpy.context.active_object
    selected = bpy.context.selected_objects

    for obj in selected:
        obj.dimensions = active.dimensions
  1. Parent the bounding box to the target object so the relative location, rotation, and scale is kept the same. You can also set the bounding cube's Draw type to Wire in Properties > Object > Display > Maximum Draw Type.

This processes could be automated in python:

import bpy

selected = bpy.context.selected_objects

for obj in selected:
    #ensure origin is centered on bounding box center
    bpy.ops.object.origin_set(type='ORIGIN_GEOMETRY', center='BOUNDS')
    #create a cube for the bounding box
    bpy.ops.mesh.primitive_cube_add() 
    #our new cube is now the active object, so we can keep track of it in a variable:
    bound_box = bpy.context.active_object 

    #copy transforms
    bound_box.dimensions = obj.dimensions
    bound_box.location = obj.location
    bound_box.rotation_euler = obj.rotation_euler

This adds a bounding box object for every selected object.
From my answer here, you can create a bounding cube around an object:

  1. Select the target object and press CtrlShiftAltC > Origin to goemetry, and then press F6 and select bounds center.
  1. With the target object selected, press ShiftS> Cursor to selected to move the cursor to the objects origin.

  2. Add a cube to be the bounding box. It will automatically be centered at the 3D cursor, which is snapped to the target object's origin point.

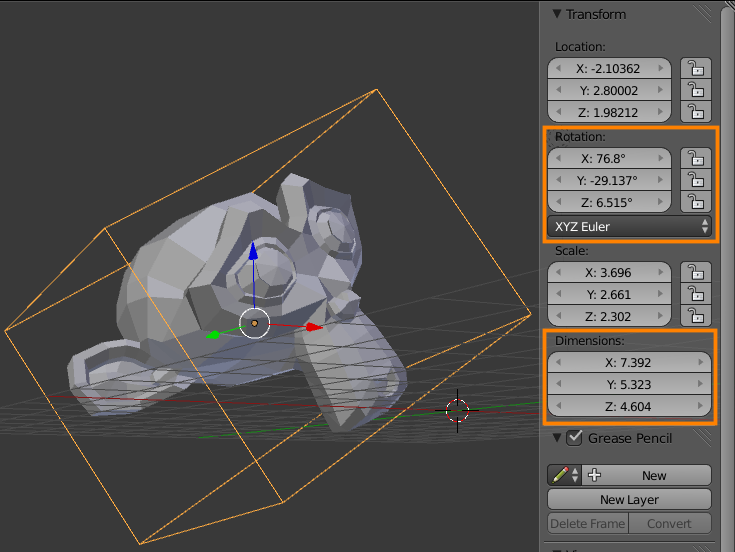
  3. Copy the Dimension and Rotation values from the target object to the bounding cube. These values are located on the Properties region (N in the 3D view):

enter image description here

You can quickly copy and paste values by hovering over the number field and pressing CtrlC/CtrlV accordingly.

Since this process of copying and pasting the values of each channel can be a bit tedious, you can use a quick bit of python to do this for you:

    import bpy

    active = bpy.context.active_object
    selected = bpy.context.selected_objects

    for obj in selected:
        obj.dimensions = active.dimensions
  1. Parent the bounding box to the target object so the relative location, rotation, and scale is kept the same. You can also set the bounding cube's Draw type to Wire in Properties > Object > Display > Maximum Draw Type.

This processes could be automated in python:

import bpy

selected = bpy.context.selected_objects

for obj in selected:
    #ensure origin is centered on bounding box center
    bpy.ops.object.origin_set(type='ORIGIN_GEOMETRY', center='BOUNDS')
    #create a cube for the bounding box
    bpy.ops.mesh.primitive_cube_add() 
    #our new cube is now the active object, so we can keep track of it in a variable:
    bound_box = bpy.context.active_object 

    #copy transforms
    bound_box.dimensions = obj.dimensions
    bound_box.location = obj.location
    bound_box.rotation_euler = obj.rotation_euler

This adds a bounding box object for every selected object.

added 321 characters in body
Source Link
gandalf3
  • 158.3k
  • 60
  • 612
  • 1.1k

From my answer here, you can create a bounding cube around an object:

  1. Select the target object and press CtrlShiftAltC > Origin to goemetry, and then press F6 and select bounds center.
  1. SelectWith the target object andselected, press ShiftS> Cursor to selected to move the cursor to the objects origin.

  2. Add a cube to be the bounding box. It will automatically be centered at the 3D cursor, which is snapped to the target object's origin point.

  3. Copy the Dimension and Rotation values from the target object to the bounding cube. These values are located on the Properties region (N in the 3D view):

enter image description here

You can quickly copy and paste values by hovering over the number field and pressing CtrlC/CtrlV accordingly.

Since this process of copying and pasting the values of each channel can be a bit tedious, you can use a quick bit of python to do this for you:

    import bpy

    active = bpy.context.active_object
    selected = bpy.context.selected_objects

    for obj in selected:
        obj.dimensions = active.dimensions
  1. Parent the bounding box to the target object so the relative location, rotation, and scale is kept the same. You can also set the bounding cube's Draw type to Wire in Properties > Object > Display > Maximum Draw Type.

This processes could be automated in python:

import bpy

selected = bpy.context.selected_objects

for obj in selected:
    #ensure origin is centered on bounding box center
    bpy.ops.object.origin_set(type='ORIGIN_GEOMETRY', center='BOUNDS')
    #create a cube for the bounding box
    bpy.ops.mesh.primitive_cube_add() 
    #our new cube is now the active object, so we can keep track of it in a variable:
    bound_box = bpy.context.active_object 

    #copy transforms
    bound_box.dimensions = obj.dimensions
    bound_box.location = obj.location
    bound_box.rotation_euler = obj.rotation_euler

This adds a bounding box object for every selected object.

From my answer here, you can create a bounding cube around an object:

  1. Select the target object and press ShiftS> Cursor to selected to move the cursor to the objects origin.

  2. Add a cube to be the bounding box. It will automatically be centered at the 3D cursor, which is snapped to the target object's origin point.

  3. Copy the Dimension and Rotation values from the target object to the bounding cube. These values are located on the Properties region (N in the 3D view):

enter image description here

You can quickly copy and paste values by hovering over the number field and pressing CtrlC/CtrlV accordingly.

Since this process of copying and pasting the values of each channel can be a bit tedious, you can use a quick bit of python to do this for you:

    import bpy

    active = bpy.context.active_object
    selected = bpy.context.selected_objects

    for obj in selected:
        obj.dimensions = active.dimensions
  1. Parent the bounding box to the target object so the relative location, rotation, and scale is kept the same. You can also set the bounding cube's Draw type to Wire in Properties > Object > Display > Maximum Draw Type.

This processes could be automated in python:

import bpy

selected = bpy.context.selected_objects

for obj in selected:
    #create a cube for the bounding box
    bpy.ops.mesh.primitive_cube_add() 
    #our new cube is now the active object, so we can keep track of it in a variable:
    bound_box = bpy.context.active_object 

    #copy transforms
    bound_box.dimensions = obj.dimensions
    bound_box.location = obj.location
    bound_box.rotation_euler = obj.rotation_euler

This adds a bounding box object for every selected object.

From my answer here, you can create a bounding cube around an object:

  1. Select the target object and press CtrlShiftAltC > Origin to goemetry, and then press F6 and select bounds center.
  1. With the target object selected, press ShiftS> Cursor to selected to move the cursor to the objects origin.

  2. Add a cube to be the bounding box. It will automatically be centered at the 3D cursor, which is snapped to the target object's origin point.

  3. Copy the Dimension and Rotation values from the target object to the bounding cube. These values are located on the Properties region (N in the 3D view):

enter image description here

You can quickly copy and paste values by hovering over the number field and pressing CtrlC/CtrlV accordingly.

Since this process of copying and pasting the values of each channel can be a bit tedious, you can use a quick bit of python to do this for you:

    import bpy

    active = bpy.context.active_object
    selected = bpy.context.selected_objects

    for obj in selected:
        obj.dimensions = active.dimensions
  1. Parent the bounding box to the target object so the relative location, rotation, and scale is kept the same. You can also set the bounding cube's Draw type to Wire in Properties > Object > Display > Maximum Draw Type.

This processes could be automated in python:

import bpy

selected = bpy.context.selected_objects

for obj in selected:
    #ensure origin is centered on bounding box center
    bpy.ops.object.origin_set(type='ORIGIN_GEOMETRY', center='BOUNDS')
    #create a cube for the bounding box
    bpy.ops.mesh.primitive_cube_add() 
    #our new cube is now the active object, so we can keep track of it in a variable:
    bound_box = bpy.context.active_object 

    #copy transforms
    bound_box.dimensions = obj.dimensions
    bound_box.location = obj.location
    bound_box.rotation_euler = obj.rotation_euler

This adds a bounding box object for every selected object.

added 506 characters in body
Source Link
gandalf3
  • 158.3k
  • 60
  • 612
  • 1.1k

From my answer here, you can create a bounding cube around an object:

  1. Select the target object and press ShiftS> Cursor to selected to move the cursor to the objects origin.

  2. Add a cube to be the bounding box. It will automatically be centered at the 3D cursor, which is snapped to the target object's origin point.

  3. Copy the Dimension and Rotation values from the target object to the bounding cube. These values are located on the Properties region (N in the 3D view):

enter image description here

You can quickly copy and paste values by hovering over the number field and pressing CtrlC/CtrlV accordingly.

Since this process of copying and pasting the values of each channel can be a bit tedious, you can use a quick bit of python to do this for you:

    import bpy

    active = bpy.context.active_object
    selected = bpy.context.selected_objects

    for obj in selected:
        obj.dimensions = active.dimensions
  1. Parent the bounding box to the target object so the relative location, rotation, and scale is kept the same. You can also set the bounding cube's Draw type to Wire in Properties > Object > Display > Maximum Draw Type.

This processes could be automated in python:

import bpy

selected = bpy.context.selected_objects

for obj in selected:
    #create a cube for the bounding box
    bpy.ops.mesh.primitive_cube_add() 
    #our new cube is now the active object, so we can keep track of it in a variable:
    bound_box = bpy.context.active_object 

    #copy transforms
    bound_box.dimensions = obj.dimensions
    bound_box.location = obj.location
    bound_box.rotation_euler = obj.rotation_euler

This adds a bounding box object for every selected object.

From my answer here, you can create a bounding cube around an object:

  1. Select the target object and press ShiftS> Cursor to selected to move the cursor to the objects origin.

  2. Add a cube to be the bounding box. It will automatically be centered at the 3D cursor, which is snapped to the target object's origin point.

  3. Copy the Dimension and Rotation values from the target object to the bounding cube. These values are located on the Properties region (N in the 3D view):

enter image description here

You can quickly copy and paste values by hovering over the number field and pressing CtrlC/CtrlV accordingly.

Since this process of copying and pasting the values of each channel can be a bit tedious, you can use a quick bit of python to do this for you:

    import bpy

    active = bpy.context.active_object
    selected = bpy.context.selected_objects

    for obj in selected:
        obj.dimensions = active.dimensions
  1. Parent the bounding box to the target object so the relative location, rotation, and scale is kept the same. You can also set the bounding cube's Draw type to Wire in Properties > Object > Display > Maximum Draw Type.

This processes could be automated in python.

From my answer here, you can create a bounding cube around an object:

  1. Select the target object and press ShiftS> Cursor to selected to move the cursor to the objects origin.

  2. Add a cube to be the bounding box. It will automatically be centered at the 3D cursor, which is snapped to the target object's origin point.

  3. Copy the Dimension and Rotation values from the target object to the bounding cube. These values are located on the Properties region (N in the 3D view):

enter image description here

You can quickly copy and paste values by hovering over the number field and pressing CtrlC/CtrlV accordingly.

Since this process of copying and pasting the values of each channel can be a bit tedious, you can use a quick bit of python to do this for you:

    import bpy

    active = bpy.context.active_object
    selected = bpy.context.selected_objects

    for obj in selected:
        obj.dimensions = active.dimensions
  1. Parent the bounding box to the target object so the relative location, rotation, and scale is kept the same. You can also set the bounding cube's Draw type to Wire in Properties > Object > Display > Maximum Draw Type.

This processes could be automated in python:

import bpy

selected = bpy.context.selected_objects

for obj in selected:
    #create a cube for the bounding box
    bpy.ops.mesh.primitive_cube_add() 
    #our new cube is now the active object, so we can keep track of it in a variable:
    bound_box = bpy.context.active_object 

    #copy transforms
    bound_box.dimensions = obj.dimensions
    bound_box.location = obj.location
    bound_box.rotation_euler = obj.rotation_euler

This adds a bounding box object for every selected object.

added 220 characters in body
Source Link
gandalf3
  • 158.3k
  • 60
  • 612
  • 1.1k
Loading
Source Link
gandalf3
  • 158.3k
  • 60
  • 612
  • 1.1k
Loading